TOP 5 Heat Sinks TOP 5 Low Profile Heat Sinks TOP 5 Liquid Coolers
Heatsinks by Brand / Mfgr Reviews + Articless Advanced Search
|
TOP 5 Heat Sinks TOP 5 Low Profile Heat Sinks TOP 5 Liquid Coolers Heatsinks by Brand / Mfgr Reviews + Articless Advanced Search |
Tweak your CPU! To tweak our test Celeron we had to flatten and smooth the surface of the cpu-plate so it would make better contact with our heat sink. Sanding (or lapping) that plate had the benefit of not only smoothing the surface, but also polishing it. Polishing would help to ensures that when the heat sink is attached, the thin layer of thermal grease on it would easily fill any microscopic voids on either surface, and also make better contact all around.
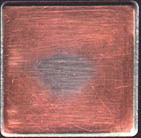
We found a surface that was smooth and absolutely flat - since thick glass (like a table top, or window) generally is, we used that. A piece of 600 grit silicon carbide sandpaper was placed rough-side up on the glass and a few drops of oil driped on. The processor was fliped over so that the CPU-plate was resting on the sandpaper and a small piece of anti-static foam placed overtop of the pins to pretect them. Pressing down gently, the processor was moved in small circles, changing direction every few seconds, and turned around every once in a while. This hopefully stopped any one side from being ground off more than another in the event pressure was not equally distributed to the back. A few drops of oil were added when things got dry. It took us 15-20 minutes before our test Celeron was ready. We took an extra step, burnishing, then polishing the CPU-plate. As the sandpaper is worn away, it should be fairly smooth by the end, and shine up the CPU-plate nicely however.
Choosing the right heat sink After all that effort we needed to use the right type of heat sink. As we mentioned most OEM heat sinks we looked at tended to bow out in the center slightly. The majority of today's heat sinks are extruded - molten aluminum is pushed through large steel dies in somewhat the same fashion as noodles are made. Anyhow, when the aluminum comes out of the die it is cooled and internal stresses develop as the metal solidifies. That sounds like a really complicated 10 page explanation, and it is ;-) All you need to know is those internal stresses warp and distort the heat sink a small degree. If you have a good steel ruler or something quite straight, hold its edge to the back of a heat sink, in front of a lightsource and see what I mean. You will most probably see a splinter of light shine through. If you don't then you've got a good heat sink and it is quite flat! That said, we dicided to use the Cooler Master picuted above. We tested three we had, and two were out of wack, while this one was just about dead on for flatness - so flatness can vary heat sink to heat sink. We removed the thermal pad and quickly sanded the bottom (in the same way as with the processor) to ensure the best possible surface for our test anyhow. Testing: We took our tweaked Celeron and applied a small dab of Z9-thermal grease (silicon based), and did the same to the heat sink. Using a piece of old rubber inner-tube to spread the grease around till it was one uniform layer. I find rubber does a better job of this then using a finger. The Celeron went into the PPGA-370 socket and the heat sink went onto the CPU with some even pressure and a twisting motion to dislodge any excess thermal compound. One thermistor was placed in between the fins of the heat sink overtop of the center of the CPU, and another between the heatsink and the side of the CPU. The average of both measurements was used. We did three types of tests, before the Celeron was modified and then after. The first test was normal usage, and the second a simulated CPU fan failure for 20 minutes and the third overclocking to 550 MHz - stability was not tested however. Here are the results we got.
The results speak for themselves. Improving the surface finish and flatness of the CPU-plate (and heat sink), improves the performance of the computer by reducing the temperature the processor runs at. The average improvement we saw was about 18% .
Conclusions The decrease in overall processor operating temperature is significant enough to make this a worthwhile modification for the Celeron. With better heatsinks like an Alpha, and case cooling, the temperature of this Celeron certainly could be brought down even further. While this isn't something for everyone to do, for those looking for that extra edge in performance, smoothing the kinks out of your CPU can help to keep things a lot cooler.
|
|
|||||||||||||||||||||||||||||||||||||||||||||||||||||
|
Find a Heatsink . Latest Heatsink Reviews . Top 5 Heatsinks Tested . Top 5 Low Profile Heatsinks . Top 5 Liquid Coolers . Heatsinks by Mfgr / Brand |
Social Media |
FrostyTech.com Info . Feedback . Contact Us / Heatsink Submissions . Submit News . Privacy Policy |
 | |
© Copyright 1999-2025 www.frostytech.com All Rights Reserved. Privacy policy and Terms of Use Images © FrostyTech.com and may not be reproduced without express written permission. Current students and faculty of accredited Universities may use Frostytech images in research papers and thesis, provided each image is attributed. | ||||