TOP 5 Heat Sinks TOP 5 Low Profile Heat Sinks TOP 5 Liquid Coolers
Heatsinks by Brand / Mfgr Reviews + Articless Advanced Search
|
TOP 5 Heat Sinks TOP 5 Low Profile Heat Sinks TOP 5 Liquid Coolers Heatsinks by Brand / Mfgr Reviews + Articless Advanced Search |
For our testing we used a digital thermometer adapted to connect to various
thermal probes. Originally this temperature sensor came with one sensor on a six-foot length of
wire, but the downside was that we
had to constantly stop and move the probe around. Now,
multiple probs can be placed, and hooked up to the sensor when we need
a reading.
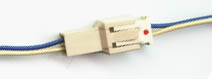
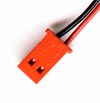
The femal connector was attached to the sensor display. Various male connectors were connected when needed. What that means is if there are four thermistors within the computer, each one must be sequencially hooked up to the display sensor to determine the temperature of that particular thermistor. It's the best possible solution we could come up with for the moment - hooking up a little connector is a lot easier then moving the requisate thermistor all around.
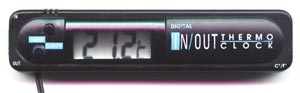
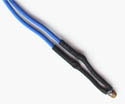
The digital thermometer pictured below was intended to be placed by a window with the sensor on the outside enabling it to display how hot or cold it is. I believe it cost about $12-$15 at a hardware store. Radio shack will probably have something similar that does the same job if you can't find one near you. Note that thermistor leads should always be insulated. Using one with bare leads could 1) sort itself our and not provide a reading or, 2) short out a component on the CPU-card or Mother Board and damage the computer. To insulate the leads is a simple affair. Heatshrink tubing is slid over the wires before they are soldered, and then positioned over the exposed metal after soldering is complete. Heating of the tubing material (hair drier / lighter) causes it to decrease in diameter, encasing the wire and thus insulating it from possible shorts. In the image below you can see a finished thermistor after the leads have been insulated. This can also be accomplished easily with electrical tape as well.
To maintain accurate readings with salvaged thermistors
they must be identical to the one packaged with the digital thermometer. The
quickest way to tell this is to compare the two sensors. Holding the
thermistor from the battery next to the one from the digital thermometer will
quickly establish compatibility (assuming the thermometers' thermistor is
visible). On the sensor used in this test, the thermistor was in a black
plastic housing, but from the underside was visible as it was held in place
with clear silicon. The sensor display is necessary regardless of what
thermistors you happen to have. If the thermistor is encased in lots of plastic
the reading won't be very good, and optimal placement will be difficult - thus
removing the plastic carefully is a good idea anyway. Once the plastic is gone,
the type of thermistor is clearly visible. If unsure of what temp sensor to get,
look for the one pictured. Our testing digital thermometer has a 10 K Ohm thermistor, and the thermistor we pulled from the battery is identical in resistance so we were able to hook them up to one another. One last way to test out the usability of these thermistors, is to hook one up and see what kind of values are displayed on the measuring device. Chances are that if it displays the correct room temp they are compatible. All that remains once everything is hooked up is to put the thermistor where can tell the processor temp. On the heat sink is usually the easiest spot. A little silicon to hold it in place, and some foam to insulated it from the fan will do the trick. All this took to do was a soldering iron and a few minutes. Easy. If you know any other good places to get thermistors, please post it too the BBS - I still need a few of them, and that store is out of batteries... ;-) | ||||||||||||||||||||