TOP 5 Heat Sinks TOP 5 Low Profile Heat Sinks TOP 5 Liquid Coolers
Heatsinks by Brand / Mfgr Reviews + Articless Advanced Search
|
TOP 5 Heat Sinks TOP 5 Low Profile Heat Sinks TOP 5 Liquid Coolers Heatsinks by Brand / Mfgr Reviews + Articless Advanced Search |
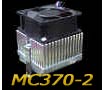
Killer Looks
So what do you get when you buy this bad boy? Besides the cooler itself, you are supplied with a little tube of thermal compound, two specially designed clips to securely attach your cooler on your socket, a 2.5"x2.5" neoprene patch, a 30mm x 30mm neoprene patch and of course some pretty adequate instruction on how to perform the entire modification. Swiftech's web site provides the same information in a bit more detail. Installing the MC 370-2 into your mainboard requires a bit of preparation on your part, mainly to prevent condensation from forming on your sensitive electronic parts. The 40mm TEC under the right conditions has the potential of dropping your CPU temperature below ambient temperature, and this is where condensation begins. In our testing we never had conditions favorable for condensation, but we still took the time to prepare the motherboard for installation. You can never be too safe. So, let's get started: Step 1:Ensure you have a tube of GE Silicon II or similar type of material and of course a beefy power supply to handle the current requirements of the TEC. A 300 Watt AT power supply is highly recommended. In our tests we used a 300 Watt ATX power supply, so we were forced to run an additional system side by side with our test system so that we can turn on the extra power supply. If anyone knows of a relatively painless way to hook up two ATX power supplies together so that they can be turned on with one switch, definitely drop us a line. Step 2: Remove the mainboard from your case. Trust me, it makes the job a LOT easier. Step 3: Apply the big 2.5"x2.5" patch on the back of your motherboard directly on top of the soldered pins for your socket. It's self sticking, so it's not that big of a problem. Step 4: Fill the CPU socket cavity with the silicone material ensuring that you leave enough room on top for the 30mm x 30mm neoprene patch to be flush with the top of the CPU socket. In our testing we utilized the ABIT BP6 motherboard, so we cut a small hole in the middle of the neoprene patch so the motherboards thermal sensor which is located in the middle of the socket cavity itself could stick out for accurate CPU temperature readings. In other words, don't cover the thermal sensor with the silicone or the patch itself. Step 5: Seal all around the base of the socket with silicone. This is definitely easier said than done, because of the large number of capacitors which surround the socket itself making your job a lot harder. Step 6: Insert the CPU in the socket, and apply a thin layer of silicone all around the pedestal of the CPU itself. Ensure you don't apply silicone on top of the core itself just around the area surrounding the core. Step 7: Apply a thin layer of the provided thermal compound on top of the CPU core. Step 8: Mount the cooler on top of the CPU ensuring the TEC is centered on the core and very carefully tighten the provided clips on the socket. Ensure even pressure on both sides. This is very important. Even pressure will make or break your overclocking quest. That's it. Keep in mind, these instructions are not meant to replace the instructions that are provided with the cooler. We provided them as a merely informational tool, so that you get an idea of what's involved in mounting the MC 370-2 on your system. The instructions provided with the cooler are a lot more detailed along with helpful pictures. Okay, now that we covered our butts, let's fire this puppy up.
|
|
|||||||||||||||||||||||||
|
Find a Heatsink . Latest Heatsink Reviews . Top 5 Heatsinks Tested . Top 5 Low Profile Heatsinks . Top 5 Liquid Coolers . Heatsinks by Mfgr / Brand |
Social Media |
FrostyTech.com Info . Feedback . Contact Us / Heatsink Submissions . Submit News . Privacy Policy |
 | |
© Copyright 1999-2025 www.frostytech.com All Rights Reserved. Privacy policy and Terms of Use Images © FrostyTech.com and may not be reproduced without express written permission. Current students and faculty of accredited Universities may use Frostytech images in research papers and thesis, provided each image is attributed. | ||||