TOP 5 Heat Sinks TOP 5 Low Profile Heat Sinks TOP 5 Liquid Coolers
Heatsinks by Brand / Mfgr Reviews + Articless Advanced Search
|
TOP 5 Heat Sinks TOP 5 Low Profile Heat Sinks TOP 5 Liquid Coolers Heatsinks by Brand / Mfgr Reviews + Articless Advanced Search |
Computer Test Platform
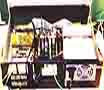
The funny looking contraption you see below is not the latest trend in case design, no it IS the trend! Seriously, looking at our test system, one thing is blatantly obvious, that's an XT case. XT cases are supposed to be useless right? Wrong. What made us choose to use one of these archaic devices was the hood. That nice little piece of convenience that opens at the push of a button to reveal all that is inside. We rip apart or build computers almost every other day - I won't even get started on screw vs. screwless cases - and this modded case gives us access to the components like no other case currently does. The XT case opens and closes in less then a second (I challenge anyone to find a mid-tower that can do that!), but does have its drawbacks. Namely, it came with the wrong type of powersupply, incorrect mounting holes, improperly configured back plate, and the list goes on. Essentially everything that made it an XT case is a problem. Problems need modification, and we thrive on modification! First we ripped everything out except for the front and back metal plates (apart from the top and bottom shells). Then as we're using an Abit BH6 motherboard currently, we placed it inside the case and marked where the holes should be. Surprisingly a few of them did line up. Six of them didn't ;-( After drilling the holes, we installed standoffs, and used nuts to secure them from the bottom. We tested to see if everything fit and it did, so onto the next challenge. It's a good idea to take all the components that are going to go in the case and dry fit them as it were, just to see how everything will go together before starting to drill anything. At left is the setup that worked best for us.
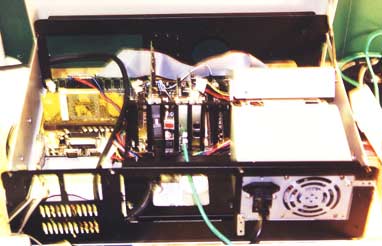
We ended up chucking basically every component that was originally in the case - except the 720 k drive. I predict that in 40 years these things will become collectors items - like the Model T! Start your stockpiles now! Oh, we also kept the metal frame that had been used to hold the Hard Drive, and Floppies. Instead of using it for that purpose (that would mean no modifications!) we put an ATX powersupply in one side and kept the other empty. As there was just enough space under this frame, we hid the Primary Hard Drive there. That left only the A/> drive and the CD-ROM. We left the A-drive out cause this system is on the Ethernet. The CD-ROM was a bit more tricky to deal with though. After trying many, many different mounting ideas, it ended up going behind the powersupply at a 45 degree angle. I had a support from an older Dell case that I used to prop it up, but just about anything could be used. Lastly the attachment which had been screwed on to the back of the case to facilitate attaching the slot cards to was cut down from its full size. That was about it for installing everything, now it was time to clean up all the wires. The IDE 1 cable was run under the motherboard in the space provided by the standoffs, directly to the Primary Master (this wasn't going t be moved often so accessibility wasn't an issue here). Power cords were tucked under the floppy support frame as much as possible, and the IDE 2 was brought over to the CD-ROM. The cut down slot attachment was attached to a few cards - it serves mostly to keep them separated, and is not attached to any other point in the modified case. That all done, the slots were filled up with a PCI video and NIC card, and an improvised power button made from the XT's old 'turbo' button. A Celeron 366MHz and 32Mb SDRAM were dropped in, and it was ready to go. As a final touch a carrying handle was installed on the side of the case so it could be closed up and transported easily.
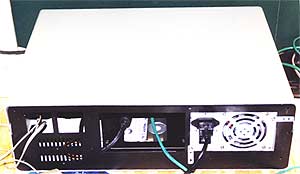
One thing to notice about this test system is that all connections are made from the front. With the amount of connections that need to be made, changed and made again this is the only way to go. Every cable, card, and switch is accessible from the front on the outside, and if anything on the inside needs to be adjusted, it takes 1 second to open the case and get at it. This convince makes it one hell of a test platform. Basically it's ugly as hell but it works really well! |
|
|||||||||||||||
|
Find a Heatsink . Latest Heatsink Reviews . Top 5 Heatsinks Tested . Top 5 Low Profile Heatsinks . Top 5 Liquid Coolers . Heatsinks by Mfgr / Brand |
Social Media |
FrostyTech.com Info . Feedback . Contact Us / Heatsink Submissions . Submit News . Privacy Policy |
 | |
© Copyright 1999-2025 www.frostytech.com All Rights Reserved. Privacy policy and Terms of Use Images © FrostyTech.com and may not be reproduced without express written permission. Current students and faculty of accredited Universities may use Frostytech images in research papers and thesis, provided each image is attributed. | ||||